
Upcycled Furniture Restoration as a Hobby: Turning Trash into Treasure (and Saving a Ton of Cash)
Let’s be honest — there’s something deeply satisfying about dragging a beat-up, paint-splattered dresser off the curb and, a few weekends later, watching it shine like a vintage gem in your living room. Upcycled furniture restoration isn’t just a hobby; it’s a kind of alchemy. You’re taking something the world declared worthless and giving it a second life. And honestly? It’s addictive.
I started with a wobbly nightstand I found on a rainy Tuesday. It had a drawer that smelled like mothballs and a leg that was barely hanging on. Three coats of chalk paint, some wood glue, and a lot of patience later… I was hooked. That little table now sits by my bed, holding my coffee mug and a stack of dog-eared novels. Every time I look at it, I feel a weird little jolt of pride.
So if you’re curious about diving into this world — or just want to know why people spend their weekends sanding instead of binge-watching — here’s the deal. This is your guide to upcycled furniture restoration as a hobby. No fluff, no gatekeeping. Just the real, gritty, beautiful truth.
Why Upcycled Furniture Restoration? (The “Why” Matters)
Sure, you could buy a brand-new bookshelf from a big-box store. It’ll be flat-packed, particleboard, and — let’s face it — kind of soulless. But upcycling? That’s different. It’s personal. It’s sustainable. And it’s way cheaper than you think.
Here’s a few reasons people fall in love with this hobby:
- It’s eco-friendly on a gut level — Every piece you restore is one less hunk of furniture in a landfill. The EPA estimates that over 9 million tons of furniture are trashed each year in the U.S. alone. You’re literally fighting waste, one sanded edge at a time.
- You save serious money — A solid wood mid-century dresser might cost $800 at a vintage store. You can find the same thing at a thrift shop for $40. Sure, you’ll put in elbow grease, but your wallet will thank you.
- Creative freedom is off the charts — You’re not following a paint-by-numbers kit. You choose the color, the hardware, the finish. Maybe you want a neon pink side table with brass lion paws. Go for it.
- It’s oddly meditative — Sanding wood, stripping paint, applying that first smooth coat of varnish… it’s repetitive in a calming way. Like knitting, but with power tools.
Getting Started: What You Actually Need (No, You Don’t Need a Workshop)
One of the biggest myths about furniture restoration is that you need a garage full of industrial gear. You don’t. I’ve restored pieces on my apartment balcony, using a drop cloth and a lot of hope. Here’s the bare-bones starter kit:
| Tool / Material | Why You Need It | Budget-Friendly Tip |
|---|---|---|
| Sandpaper (various grits) | To smooth surfaces and remove old finish | Buy a variety pack — 80, 120, and 220 grit |
| Orbital sander | Speeds up sanding big flat surfaces | Cheap ones work fine; borrow from a friend first |
| Chalk paint or milk paint | Adheres without heavy priming | DIY chalk paint = 1 part plaster of Paris + 3 parts latex paint |
| Paintbrushes & foam rollers | For smooth, even coats | Cheap brushes shed bristles — spend $5-7 on a decent one |
| Wood glue & clamps | For fixing wobbly joints | Gorilla Wood Glue is my go-to |
| Screwdriver set | Removing old hardware | You probably already own one |
| Drop cloth & gloves | Protect your floor and hands | Old bedsheet works as a drop cloth |
That’s it. Seriously. You can add more as you go — like a heat gun for stripping stubborn varnish, or a router for decorative edges — but start simple. The goal is to finish a project, not to own a hardware store.
Finding Your First Piece: The Thrill of the Hunt
Half the fun of upcycled furniture restoration is the treasure hunt. You never know what you’ll find. I once scored a solid walnut nightstand for $12 at a garage sale because the seller thought it was “too heavy to move.” Their loss, my gain.
Where to look:
- Facebook Marketplace — Filter by “free” or “under $20.” People just want stuff gone.
- Thrift stores — Goodwill, Salvation Army, local charities. Look for solid wood (check the drawer bottoms — if they’re plywood with a wood grain sticker, it’s likely veneer).
- Curbside — Seriously. Drive around on bulk trash pickup days. Bring gloves and a friend to help lift.
- Estate sales — These are goldmines for mid-century pieces. Go on the last day for half-off prices.
Pro tip: Look for “bones” not beauty. A piece with good joinery (dovetail drawers, solid wood frame) is worth the work. Ugly paint? That’s fixable. Wobbly legs? Wood glue. But particleboard with water damage? Walk away. You can’t fix rotten MDF.
The Restoration Process: Step-by-Step (Without the Stress)
Alright, you’ve got your piece. Now what? Let’s break it down into manageable chunks. I’ll keep it real — sometimes things go sideways. That’s part of the charm.
Step 1: Clean and Assess
First, wipe everything down with a mild soap and water. You’d be surprised how much grime hides under a layer of dust. Then, inspect the piece. Jiggle the drawers. Check for loose joints. Look for woodworm holes (tiny, neat holes in a line — if you see sawdust, that’s active; treat with borax).
Make a list of repairs: missing hardware, chipped veneer, cracked wood. Don’t panic. Most issues are fixable with wood filler or glue.
Step 2: Strip or Sand?
This is where you decide: do you want to see the natural wood grain, or are you painting over it? If you’re painting, you don’t need to strip everything. Just sand enough to rough up the surface so paint adheres. If you want bare wood, you’ll need a chemical stripper or a heat gun. Honestly? Chemical stripper is messy but fast. Heat gun is slower but less toxic. Your call.
Wear a mask. Sanding dust is nasty stuff. And open a window — stripper fumes are no joke.
Step 3: Repair and Fill
Fill any cracks or holes with wood filler. Let it dry, then sand smooth. For loose joints, apply wood glue, clamp, and wait 24 hours. For missing veneer, you can patch it with a matching wood veneer sheet — or just paint over it. I’ve done both. No shame in painting.
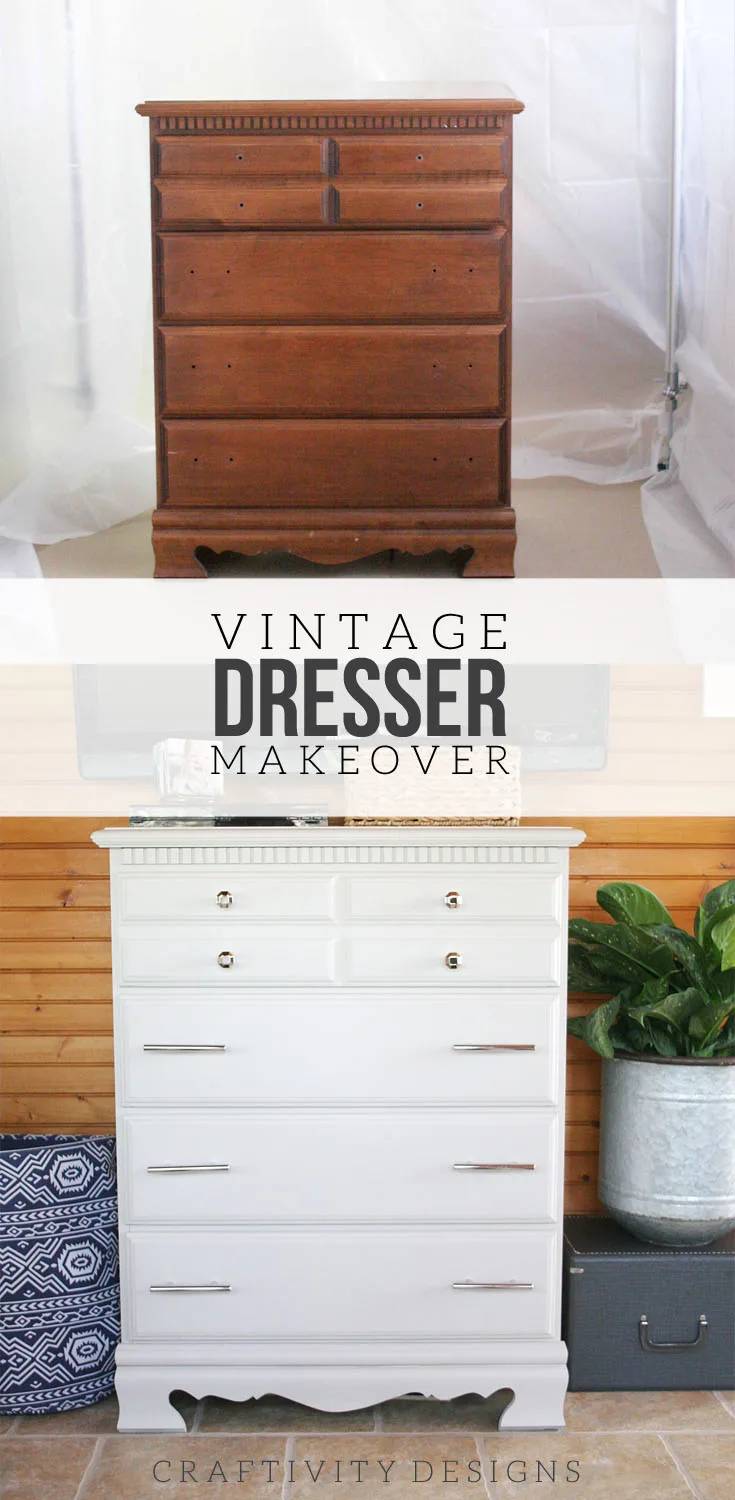
Step 4: Prime and Paint (or Stain)
If you’re painting, use a high-quality primer first — especially on glossy surfaces. Then apply two thin coats of paint. Chalk paint is forgiving; it doesn’t show brush strokes as much. For a smooth finish, lightly sand between coats with 220-grit sandpaper. Yes, it’s tedious. Yes, it’s worth it.
If you’re staining, test the color on a hidden spot first. Wood takes stain differently depending on its species. And always wipe off excess stain — leaving it on too long makes it blotchy. Trust me, I learned the hard way.
Step 5: Seal and Celebrate
Once your paint or stain is dry, apply a clear topcoat. Polyurethane for durability (tabletops), or wax for a softer sheen (side tables, dressers). Let it cure for at least 48 hours before putting anything on it. Then step back. Take a photo. You earned it.
Common Mistakes (And How to Laugh Them Off)
Look, you’re going to mess up. I’ve painted a drawer shut. I’ve sanded through veneer. I once used a dark stain on pine and it looked like a muddy puddle. It happens. Here’s how to handle it:
- Paint drips? Sand them down and repaint. No big deal.
- Stain too dark? You can lighten it by sanding lightly or using a wood bleach (test first).
- Hardware holes don’t line up? Fill old holes with wood filler, drill new ones. Easy fix.
- You hate the color? Paint over it. That’s the beauty of upcycling — nothing is permanent.
The real mistake is expecting perfection. This is a hobby, not a museum restoration. Embrace the little flaws — they tell a story.
Where This Hobby Can Take You
Some people stop at one piece. Others… well, their homes start to look like a curated vintage shop. I’ve seen folks turn their hobby into a side hustle, selling restored pieces on Etsy or at local markets. A $20 thrift store find can sell for $200 after a good restoration. Not bad for a weekend’s work, right?
But honestly, the real payoff isn’t the money. It’s the moment you walk past that dresser — the one with the brass knobs you polished yourself — and you remember where it came from. You remember the smell of sanded oak, the feel of the brush gliding over the wood, the satisfaction of fixing something broken. That’s the good stuff.
So grab a piece of sandpaper. Find a forgotten chair. Give it a second chance. You might just find that you’re giving yourself one too.
[Meta title: Upcycled